| For the 2015 Eugene Mini-Maker Faire, I want to try something a little different and a bit more interactive. I had been toying with the idea of a low-cost, 3D printed robot. Using Python code to create real-world "Turtle-like" graphics sounded like a killer application. The history of Turtle robots goes back a bit farther than I originally realized. William Grey Walter created a pair of light-sensing robots called "Elmer" and "Elsie" in the 1940s! These were designed to explore artificial intelligence at very simple levels and while not controlled by programmable digital computers, they exhibited some very distinctive life-like behaviors. |  Walter's 1948 robot named "Elsie".
|
 MIT's 1970 robot named "Arthur". MIT's 1970 robot named "Arthur".
| In the 1960 and 70s, professors at MIT, most notable Seymour Papert, explored using robots and the programming language LOGO to teach computer science. The idea that complex algorithms can be executed using simple instructions is a powerful concept common to a number of fields of study.
Enter the 21st Century. 3D printing is hitting the main-stream. Open Source projects like Python are making programming easier for everyone. And Open Hardware philosophy have us sharing both code and design files freely. Time for another era of Turtle! |
| I will post more about the robot's construction elsewhere. It suffices to say that it is powered by a Raspberry Pi Model A+ running Linux with code written in Python! The beauty of this is that you can write and test your Python Turtle commands on your computer or in a browser before they even get to the robot.
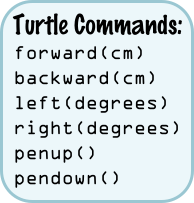
Lets look at what it takes to create a box in Turtle: Don't just sit there. Try these out for yourself at www.skulpt.org! With any luck, you will see something like this: You will have to add a t.shape("turtle") command if you actually want to see the Turtle. |  Python powered, 3D-printed, yet to be named Turtle robot. Python powered, 3D-printed, yet to be named Turtle robot.
 |
If I've got you hooked, your next challenge is to figure out how to change the "square" code to create a hexagon. I'll give you a hint. For the square, 360 degrees divided by four sides equals 90 degrees. Those number should look familiar. Next, how would you create a star pattern? That one took me a bit to figure out, and there is certainly more than one way to do it.
Update, April 2016:
I've documented two versions of the robot, one with a regular Arduino, and the other with a low-cost Arduino compatible board from Adafruit.com:
http://www.instructables.com/id/Low-Cost-Arduino-Compatible-Drawing-Robot/
http://www.instructables.com/id/Arduino-Drawing-Robot/
I've also documented how to use the robots with the "Hour of Code" tutorials:
http://www.instructables.com/id/Using-an-Arduino-Drawing-Robot-with-Hour-of-Code-T/


Do you have any more information about how you made the turtle robot?
ReplyDeleteYou bet. Guess I should update the blog post. I've documented two versions:
ReplyDeletehttp://www.instructables.com/id/Low-Cost-Arduino-Compatible-Drawing-Robot/
http://www.instructables.com/id/Arduino-Drawing-Robot/
and a little bit about using it with "Hour of Code":
http://www.instructables.com/id/Using-an-Arduino-Drawing-Robot-with-Hour-of-Code-T/